System Architecture and Data Handling
Implementing the TZMINT web application
Due to the size of this project, some planning is needed before starting to code. We will showcase our actual approach for the implementation of this whole project, and share our considerations and learnings.
We divided the project on the top level into two separate parts:
- The user-facing web application, the TZMINT web application, and
- The smart contract and the wrapper functions to interact with it.
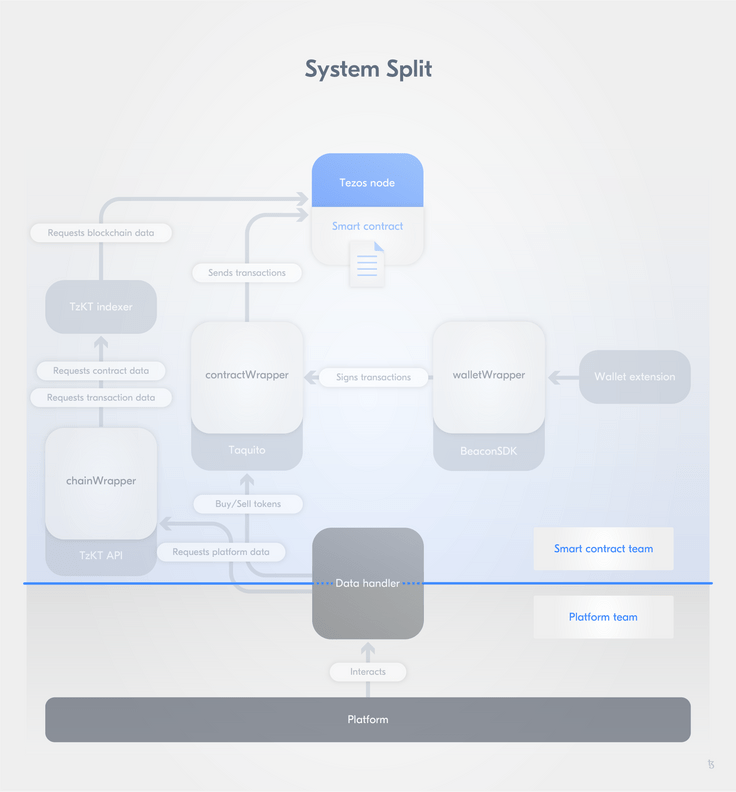
This division of concerns allows developing both parts in parallel while decreasing the complexity of each part. To ensure both parts fit together in the end, we drew a hard line between these two parts. Both are only connected through one interface: the DataHandler.

The DataHander is written in JavaScript and exposes all functions for the web application to interact with the blockchain on a high level (read and write). For the developer working on the implementation of the web application, this handler allows all interactions and does not require developers to know the actual smart contract implementation.
On the other side, the DataHandler directly calls the wrapper functions implemented by the smart contract team, which does not need to know about data processing in the web application beyond the wrapper functions. The call to the wrapper functions is also implemented in the DataHandler - as you can see in the previous image, we drew the line through the DataHandler.
With this setup, the team working on the web application does not need to be fully knowledgeable about all the blockchain-related details, while the smart contract team just needs normal JavaScript/TypeScript to implement the wrappers without knowing the frontend and backend frameworks. Not everyone needs to be a full-stack developer.
System components
Let us have a closer look at the system components to better understand how the web application runs and how the individual components relate to each other.
In this section, you can find a quick overview of the individual components of the system. Further details about their configuration and implementation can be found in the upcoming Web Application Stack section.
Next.js server
The web application itself runs on a server, serving web requests from web browsers. We use Next.js, which is an application server framework made to work with React.
One important concern when building a web application connected to a blockchain is to specify where the actual blockchain interaction should happen: on the server or the client. Luckily, on Tezos this is very flexible: we can run our own TzKT indexer, or use a public one, to query blockchain data through a REST API, which works from both the client and the server using the same implementation.
We have two options to send transactions:
- Create a transaction on the client utilizing the user's wallet using Beacon;
- Create and manage the user keys server-side and send the transactions from the server (i.e. hot wallet service).
We are taking the first option to keep full wallet control with the user and reduce the security risk of unauthorized wallet access.
The smart contract is still the heart of the whole project. The web application only facilitates interacting with the smart contract. In theory, a user could directly query the smart contract to fetch data and create a transaction manually to buy and sell. This would be quite tedious, but it is possible.
When implementing a hot wallet service though, users cannot send transactions by themselves. Therefore, if your web application becomes unavailable, only querying data is possible.
We use the public TzKT API, and thus also a public Tezos node, available at https://api.hangzhou2net.tzkt.io/. Later on, we can then easily switch this to our indexer service by changing the URL.
Smart contract and wrappers
The smart contract and the wrapper functions are implemented in a separate project, which is integrated into the main project, allowing the web application to import the wrappers.
Data query flow
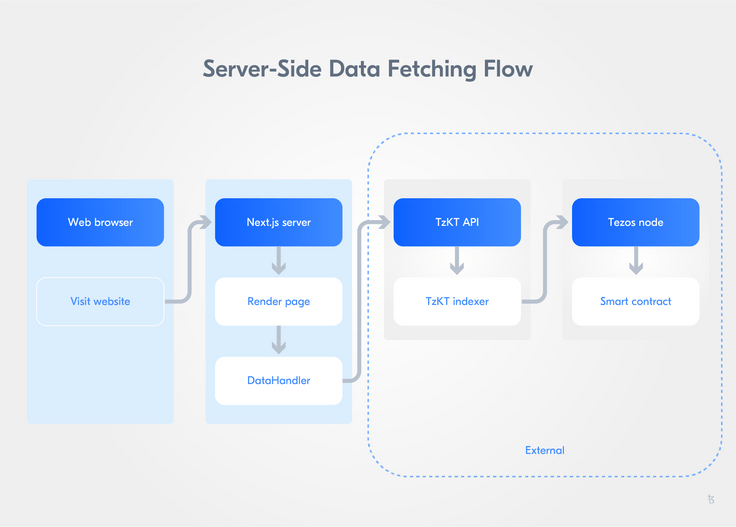
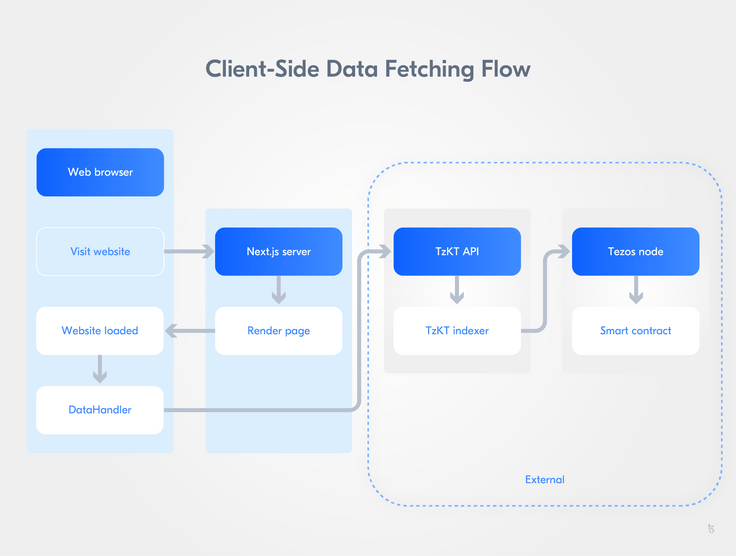
Since we can in general query both from the client and the server, we implement the DataHandler and its underlying wrappers to also support both use cases - with an exception in the case of the WalletWrapper/Beacon integration, as this only runs on the client. We can then use the same DataHandler functions everywhere, regardless of whether it is called from the client UI or by any server function. This means overall, we can support two different flows of data:
- Server-side data fetching, and
- Client-side data fetching.

When fetching the data server-side, the request to the TzKT API is made from the server directly and the result is put into the response when it is being rendered on the server. Note that this means, the query to the TzKT API must be completed before the server can start sending the response, therefore, a long response time on the TzKT API also causes a long response time from the server. To overcome this, you could first render the page without data (to quickly respond), then use Ajax to query the data from the server and update the page.
We will look into how to implement this in the upcoming Web Application Stack section.

When fetching the data client-side, the user's browser sends the request directly to the TzKT API and has to also process the result on its own. This processing on the client is the main difference to the aforementioned server-side fetching with Ajax, where the server can pre-process the data.
User authentication and database
Theoretically, we do not need to keep track of any user accounts in our application for the blockchain interaction. When a user creates a new transaction, the user's wallet takes care of the account management and keys. When querying user data, we can read the user's account address through the Beacon SDK - as shown in the connectWallet() function in the Beacon section. We could also allow users to log in with their wallet using their account address as an identifier - this is a common approach.
However, this means users need to have a wallet installed and configured to sign up, which depending on the target audience of the TZMINT web application might be something you want to assist the user with after signing up. Also, a detail we have excluded in this sample project is a full know-your-customer (KYC) process, which usually requires the user to enter personal information to confirm their identity and is required for legal reasons on projects dealing with financial assets. We will showcase a different approach, which allows users to sign up and log in just with their email address or their Google account without a password, the collection of necessary personal information, and finally, adding an extra convenience feature for the user. For this, we use NextAuth.js, which is a flexible authentication framework. Briefly explained, we are supporting the following two authentication mechanisms:
- Log in by email: The user enters their email address, which is stored on the server along with a token. An email is sent to the email address including a login link that relates to the token. When the user clicks the link, the server checks the token and stores the authentication information (i.e. session) in a user cookie;
- Log in with a third-party account: Using OAuth 2.0, we implement logging in with Google using this feature as an example.
Regarding personal information, we want to collect the username and country of the user - these two are chosen arbitrarily, just to show how to implement this feature. We need a database to store the token and personal information. We add a basic PostgreSQL database only for this purpose.
Additionally, we store the user's account address in our database. This allows us to implement an extra convenience feature: when the user is logged in, we can fetch user data (balance, transaction history, etc.) without interacting with the user's wallet. Thus, the user can log in from any device without the need to connect/unlock their wallet, but is still able to access their investment information since we only query these from the blockchain. Just to send a transaction, the user needs to actually activate their wallet.
UI frontend
Besides React, we are using Tailwind CSS as a simple CSS framework. The core idea of Tailwind is to expose the CSS functionality through composable base classes, removing the need to write specific object/component scoped CSS and instead allowing to add properties through generalized utility classes.
We will not go into the details on how to use Tailwind in this course. If you have never used it before, we strongly recommend just going ahead and try it out.
Furthermore, we use Apexcharts for the chart display.
Git repository overview
Before continuing to look into the details of our specification and implementation approach, we should take a quick look at the important folders in the GitHub repository.
In the following sections, we will show excerpts of the source code to illustrate various functions, but we recommend also looking into the corresponding source files while following the content.
Web application project
The structure of the GitHub repository is the following:
tezos-cso-project/
├─ cypress/                 Support files for end-to-end tests
├─ database/                Web app database migrations
├─ docker/                  Docker config for the end-to-end tests
├─ pages/                   Web app content pages
├─ public/                  Web app static files (images)
├─ src/
│  ├─ components/           React components
│  ├─ constants             Constants incl. navigation
│  ├─ helpers               Formatting helpers
│  ├─ middlewares           Auth.js config
│  ├─ models                Database models (ORM)
│  ├─ services              Services (handlers)
│  │  ├─ DataHandler.ts     Our main data interface
│  │  └─ UserHandler.ts     Handler for user management
│  └─ utils                 Extra hooks and param type definitions
├─ styles/                  Web app CSS styles
├─ tests/                   Web app tests (excl. end-to-end tests)
└─ tezos-app-project/       The smart contract project
(Not all are files shown)
Smart contract project
The separate GitHub repository is included as Git submodule in the web application project.
tezos-app-project/
├─ config/
│  ├─ configuration.js      Main configuration file
├─ sample/                  Sample .html and .js file, showing basic usage
├─ src/
│  ├─ chain/
│  │  └─ chain.js           Chain wrapper
│  ├─ contract/
│  │  ├─ contract.js        Contract wrapper
│  │  ├─ deployment.sh      Deployment script
│  │  ├─ TZMINT.py          Smart contract (SmartPy)
│  │  └─ TZMINT.tz          Compiled smart contract
│  ├─ wallet/
│  │  └─ wallet.js          Wallet wrapper
├─ test/                    Unit tests
(Not all are files shown)
Interface specifications
After a quick general project introduction to understand the functioning of a Rolling SAFE and the development of the base user stories, both teams worked together on the specification of the function signatures and the return data for the DataHandler on a basic level:
@return Promise.resolve(number totalInvestors) or Promise.reject(error)
totalInvestors()

@return Promise.resolve(number totalInvestments) or Promise.reject(error)
totalInvestments()

@return Promise.resolve(number companyValuation) or Promise.reject(error)
companyValuation()
You can take a look at the full (original) specification document below to get a feel for the team's first approach - please note that this document was our very first specification document. After creating this document, we began to implement the DataHandler with stubs, which then became our new specification file.
An example stub for the getInvestmentNumbers() function in the very first version is:
// General Investment Info

getInvestmentNumbers(): Promise<InvestmentNumbersDto> {
    return new Promise((resolve, reject) => {
        const data: InvestmentNumbersDto = {
            totalInvestment: '$2,000',
            investorsCount: 238,
            tokensCount: 37,
            unlockingDate: new Date("2021-07-30 12:05:33.574+00")
        };

        resolve(data);
    });
}
On the web application side, this common DataHandler with stubs allows to immediately start with the implementation of the scenarios with their views and flows. For the smart contract development, it is a perfect blueprint to be used as expected values in unit tests. This allows to start with test-driven development right away.
Later, the stubs are replaced with the chainWrapper methods according to the signatures:
class DataHandler {

    /**
     * Gets the general investment numbers
     */
    async getInvestmentNumbers(): Promise<InvestmentNumbersDto> {
        const start = new Date(process.env.DEPLOYMENT_DATE || "2021-07-21T14:02:43Z");
        const end = new Date();
        const steps = 30;

        const storage = await chain.storage();
        const [
            companyName,
            buyPrice,
            sellPrice,
            minimumFundingGoal,
            totalInvestments,
            investorsCount,
            totalTokens,
            reserveAmount,
            sellSlope,
            buySlope,
            unlockingDate,
            burnedTokensCount,
            phase,
            priceHistory
        ] = await Promise.all([
            chain.companyName(storage),
            chain.buyPrice(storage, 1),
            chain.sellPrice(1),
            chain.mfg(storage),
            chain.totalInvestments(storage),
            chain.totalInvestors(storage),
            chain.totalTokens(storage),
            chain.reserveAmount(),
            chain.sellSlope(storage),
            chain.buySlope(storage),
            chain.unlockingDate(storage),
            chain.burnedTokens(storage),
            chain.phase(storage),
            chain.priceHistory(start, end, steps)
        ]);

        return {
            companyName: companyName,
            tokenBuyPrice: +buyPrice,
            tokenSellPrice: +sellPrice,
            minimumFundingGoal: +minimumFundingGoal,
            unlockingDate: unlockingDate,
            totalInvestment: +totalInvestments,
            investorsCount: +investorsCount,
            tokensCount: +totalTokens,
            burnedTokensCount: +burnedTokensCount,
            reserveAmount: +reserveAmount,
            buySlope: +buySlope,
            sellSlope: +sellSlope,
            isMFGReached: !!+phase,
            prices: priceHistory
        };
    }
Workflows
We also used this common interface to communicate (specification) updates between the smart contract development and the application. When using automated unit tests that run on any code update, any breaking change becomes immediately visible. This is very important for any project because even with the best planning, it is natural that you might need to adjust your interface signatures as some details evolve during a project.
We will look into the details of the unit tests in the testing section, and build a full end to end test in the final testing section. You can take a look at the configuration and run results in our public repository on GitHub.
Two parts, two repositories
To further untangle the smart contract implementation details from the web application, we also split up the projects into two separate repositories:
The smart contract repository is integrated into the web application repository as a GitHub submodule. This split into two repositories allows for separate continuous integration/continuous deployment (CI/CD) workflows and less friction on pull request reviews, all helping to speed up the development when working in a team.
When a change on the smart contract functions is requested from the web application team, first the unit tests in the smart contract repository are adjusted, then these are synced to the DataHandler stubs, and only then begins the implementation of the changes on both sides.
During the initial development, it was also very easy to update the stubbed functions with this division of concerns once the smart contract and wrapper functions were ready, as the smart contract team could easily replace the stubbed data fields with the wrapper calls and push this update to the web application team to connect the functions.
Connecting system components
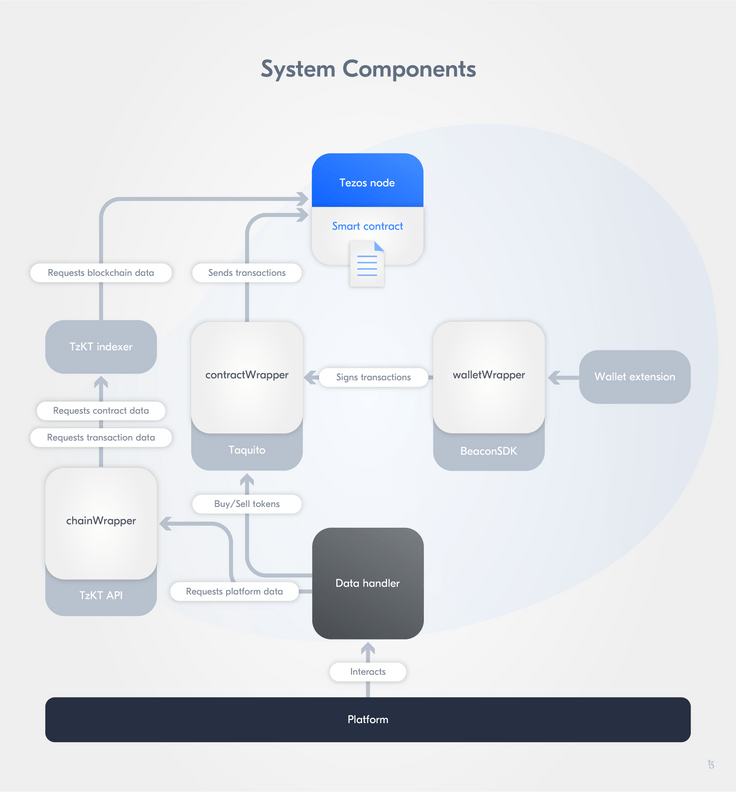
The component that brings the TZMINT web application and the Tezos blockchain together is the DataHandler. It requests the data the web application needs through wrappers, which use various Tezos APIs to interact with the blockchain and the user wallet:

The wrappers are used to fetch contract and transaction data and to call the contract. The following wrappers were used:
chainWrapper: Uses the TzKT API to fetch blockchain data, formats, and caches, and to calculate values;walletWrapper: Uses the Beacon SDK to sign the transactions;contractWrapper: UseswalletWrapperto sign the transactions and Taquito to send transactions to the Tezos node.